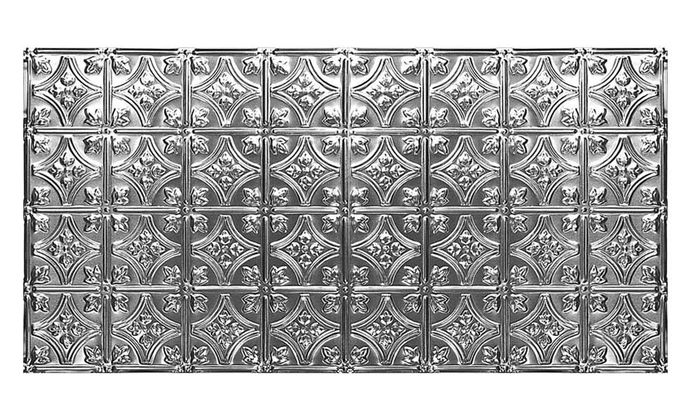
TypeDrop In or Nail Up
Dimensions23-3/4" x 47-3/4" (DI)
24" x 48" (NU)
ColorTin Metallic
MaterialTin plated steel
Thickness.015"
Weight3.4 lbs
Delivery Time7-10 Business Days
BrandHeritage Tin Series
Print/DownloadProduct Spec Sheet
No longer does the sophisticated look of a stamped metal ceiling tile have to remain in the bygone days of the Victorian Age. That same element of elegance can be found with the pressed tin ceiling options that are available here and now. Not only have these tiles of steel and tin been unchanged since the early 1800's in how they look and are made, they remain resilient in their decorative relevance.
Don't let the ceiling limit the imagination either. As a metal tile, it has a durability and fireproof nature that makes in versatile in decorating. Use them on the ceiling, as a complete wall covering, or just half a wall such as a wainscoting. Improve the look of a kitchen with a tin backsplash, metal cabinet doors, or as table tops and hutch backdrops.
Having a stamped metal tile provides the illusion of control over this period of decorating style by simply complementing its already attractive appearance with paint manipulation. Give a bar that 1920's present-day touch with tin tiles painted glossy white or purposely crackle and chip the paint to give the room an age of that same era vibe.
Finishing
Painting-
The tin plated steel sheets are ready for painting if you so desire. Make sure to select a coating appropriate for painting bare tin and to follow the directions on your coating of choice. There are hundreds of different types of coatings available. Don't be afraid to experiment. Finishing materials can be purchased at most local home improvement stores.
Natural Tin Finish-
If you love the look of the plated tin then you should apply a clear Lacquer to the tiles. Lacquer seals and places a nice hard protective finish that, when applied correctly, does not dull the natural finish of the tile. This keeps rust from forming on the edges and surface over time. Finishing materials can be purchased at most local home improvement stores.

5 Year Limited Warranty
You're making a beautiful upgrade to your ceiling and we're here to help protect that investment. We guarantee that your ceiling tiles will be free from manufacturing defects for a period of five years from the original date of purchase.
Warranty Conditions and Limitations
This warranty covers material defects in the ceiling tile when used in a standard ceiling application. It does not cover labor, consequential or incidental damages. Please note that painting the ceiling tile will void the warranty and may change some of its properties like its fire rating.
We're Ready to Help
Unlike a car, there is very little that can go wrong with these ceiling tiles. However, in the rare event that you do encounter a defect with your tiles, we are here and ready to help. Just give us a call and we will work with you to identify the problem and, in case of defect, supply you with replacement tiles.
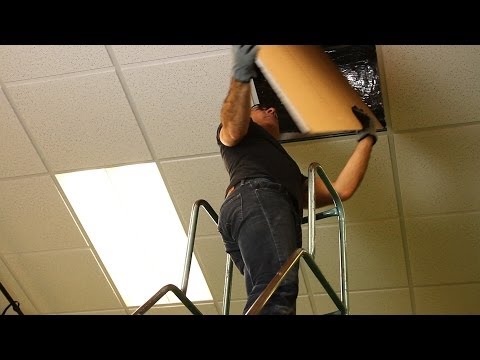
Tools Needed
1. Using sawhorses and heavy planking, erect scaffolding in the room.
2. To begin, nail furring strips to the ceiling around the perimeter of the room. Distance from the wall depends on size of cornice.
3. Locate the center of the ceiling, strike a chalk line perpendicular to the ceiling beams. This ensures that the furring will be nailed into the beams. Working out from this line, snap chalk lines at 12-inch intervals. Place the edge of the furring strip along each line and areas by inserting shims between the furring strips and the ceiling. If the ceiling is level, we find that plywooding the whole ceiling is not only easier but lowers the ceiling less (3/8" or 1/2" is fine).
4 & 5. Snap a chalk line on the center of the furring strip in the center of the room. (overlap sheets towards the door, underlap sheets moving away from the door; this is so the seam faces the back.) Align the edge of the sheet with the chalk line and attach the sheet using 1-inch common nail at 6-inch intervals where they overlap and 1-foot intervals down the center. Angle the nails for greater strength and drive them in beside the nipples on the metal sheet; the nipples will be reserved for nailing the seam of the overlapping sheet. The installer should support the metal sheets with furring strip; just to help hold it up while nailing.
6. Insert cross strips where the sheets overlap to support the seams (not necessary if you installed plywood.)
7 & 8. Use metal shears to cut irregular-shaped pieces and holes for light fixtures.
9. Position the trimmed sheets with the cut side next to the wall, where it will be hidden by the cornices.
10. Seal all seams by tapping with the head of a wide-angled chisel.
11. Nail the cornices to the furring strips at 12-inch intervals along the bottom edge and 6-inch intervals along the top edge. Join the cornices with miter joints, nicking the edges at regular intervals and bending them back to make a tighter seam. Close the seams by tapping with the head of a nail.
12. Paint the finished ceiling with an oil base paint (water-base paint rusts the metal.) ?Liquid Solder is a good way to close any gaps when joining the corners with the cornice.
1


Since I put these up in my office in the basement, three people have walked by the room and the reaction was the same for each of them. They all looked up, their jaw dropped, and they said "wow"! These are very easy to install. Proceilingtiles.com also has great customer service. Professional and quick responses. I'll be using proceilingtiles.com more in the future.